The main feature of the Apostle platform is creating and scheduling social media posts for employees, dealers, and franchisees to expand your online reach.
In three simple steps, you're ready to start sharing: Create a post, Choose channels, and Publish.
Table of contents
Create posts
The basics of a social media post
In the menu on the left-hand side, navigate to Create post. You can immediately start creating a post by adding a topic and description, and an image, video, or file.
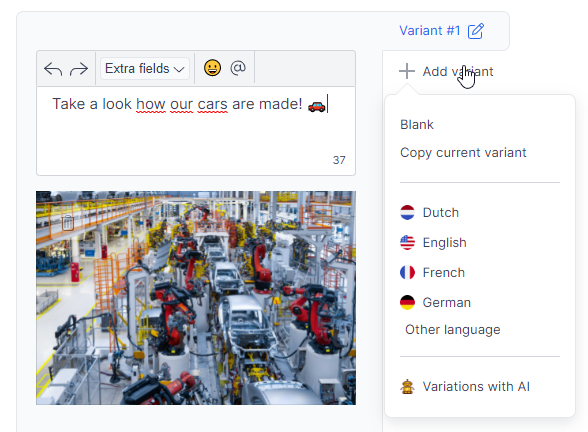
Using variations
Employees often have similar networks. To prevent them all from sharing the same post, we made it possible to create variations of one post.
- Click on Add variation. Three options will appear:
- Duplicate the post and create variations manually.
- Translate the post with the Google Translate engine. (Always check your posts after translating.)
- Let our Artificial Intelligence (AI) automatically rewrite the same post in different words! 😱 This will generate 5 new post variations without having to write them yourself. (Always check them before sharing.)
Adding and shortening links (with UTM codes)
- To add a link to your post, you can copy and paste the URL in the text field.
- Customize the link by clicking on the pencil icon.
- Click on Add UTM code and fill in the source, medium, and name (e.g. Apostle or Facebook).
- Switch on Shorten link and track link clicks if you want to track the link clicks for each brand ambassador.

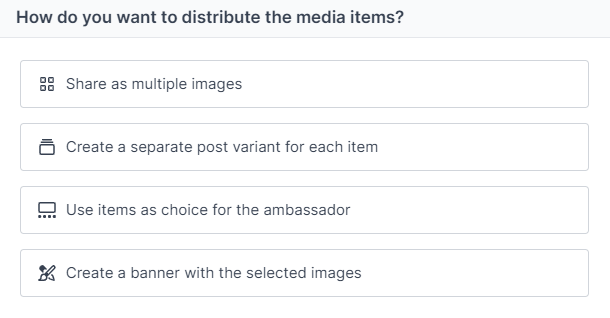
Using multiple images in one post
Creating variations works for both text and images. If you want to share multiple images in one post, we offer four options. First, upload multiple images. Then choose one of the options below.
- Share multiple images: Create a carousel post with multiple images.
- Create separate variations: Create variations and add different photos for each variation.
- Let your brand ambassadors choose: Upload multiple images and let your brand ambassadors choose which image they want to use, through their email or mobile app.
- Create a banner or picture-in-picture: Use our banner creation and compilation features to create multiple images in one post.
Choosing themes
Label your post based on your content strategy themes and topics. Choose the theme(s) that fits your post best. Labeling your posts will allow you to see how many posts you've created for each theme, in your insights. A perfect way to maintain your strategy and measure your KPIs.
Haven't created your strategy yet? Learn how to set it up in our strategy article.

Saving as a draft
To save a post as a draft, click on the bottom of the page on Save as a concept.
Choose Channels
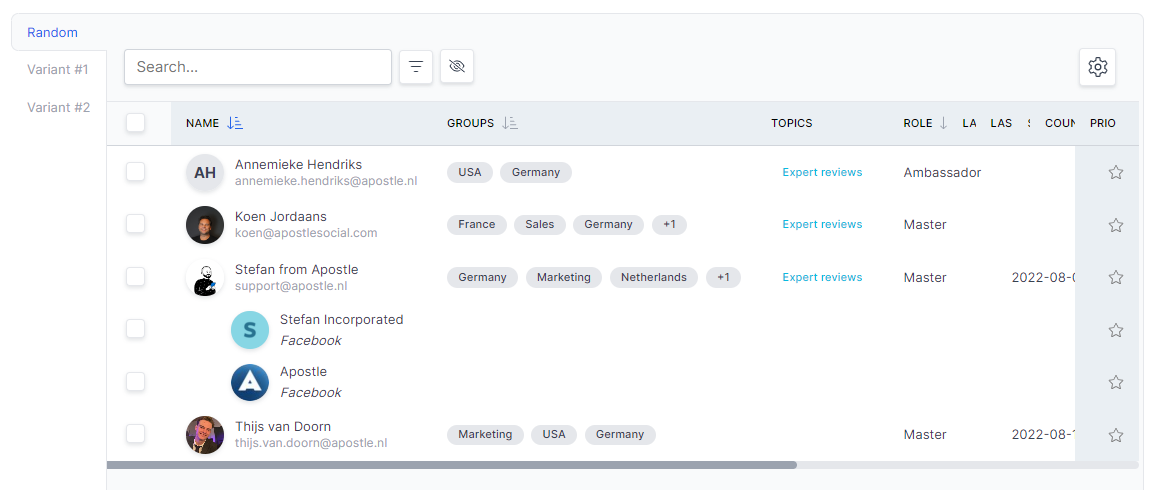
Enrolling different people/pages for each variation
After creating a post, you will have to determine which groups of ambassadors you'd like to share the post on their social media accounts.
In the search bar above, you can filter ambassadors for the groups and themes that they're connected to.
- Use Random to randomly distribute your variations over the users you have selected.
- Click Variant #1 to only select people for this specific variation.
- Click Variant #2 to only select people for this specific variation.
Customizing your table settings
To customize the information shown in the table below, click on Table Settings. Select the different factors you want to be shown in the table.
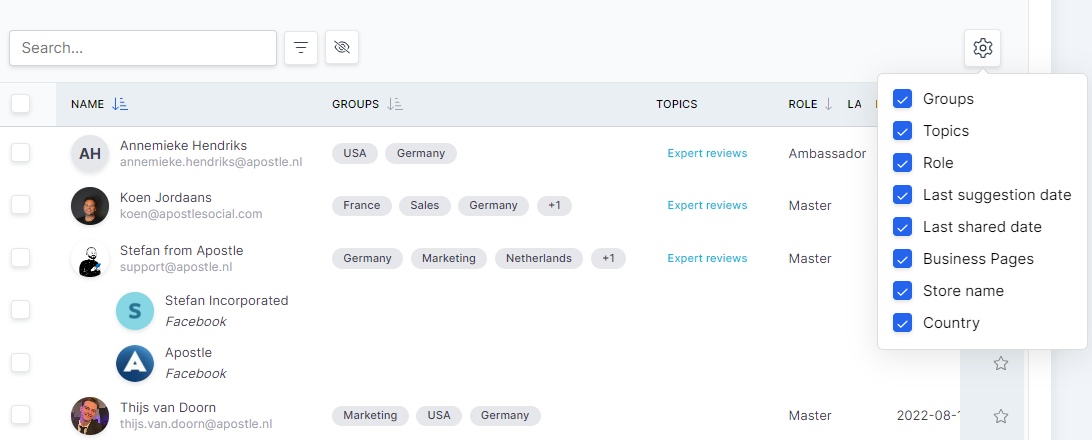
Prioritizing posts for specific people
Clicking on the Prio star to prioritize your brand ambassadors. This way, you will ensure they are the first ones that receive the scheduled post. This only applies to scheduled posts over a longer period of time.

Suggesting a post to someone from outside of your organization to share on their social media networks.
If you want partners from outside of your organization to share your post for just one time, this is how you invite them to share your post.
- Click on Email users.
- Click on Add email addresses.
- Type the email addresses of your partners in the box below.
- Click on Proceed and select the email addresses of the partners you've added.

Publish
Schedule your post
In the Send screen, you have three options to schedule your post(s):
- Schedule now: This will send out all notifications to share right away.
- Schedule in the future: Set both times to the same date and time to schedule for a fixed time in the future.
- [Recommended] Use a time frame: Select a time frame of multiple days, a week, or even a month. The platform will randomly distribute the posts during this time frame.

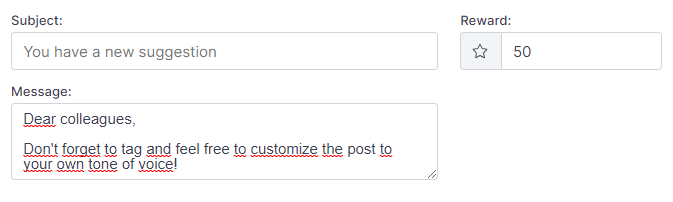
Customizing email subjects, rewards, and optional messages
In the final steps, you can choose to customize the email subject, add a message, and change the rewards of your post.
- Subject: This will change the email subject of your post.
- Message: This is an optional additional message you can send with your post. This message will not be shared online, but will appear in the email or mobile app of your brand ambassadors.
- Reward: You can manually change the sharing rewards for each post you create. If someone from your team shares a post, they will earn these points on the leaderboard.
Approving a post before sending
You can add an additional approval flow to your posting by turning on Assign extra approver before sending.
- Turn on the switch and select your extra approver. This can be either an admin or a regular user.
- Your team member will receive a notification (by email) to approve or reject the post in their Inspiration Wall. Only after this approval, the post is sent to the rest of the team.
- If a post gets rejected, you will be notified and are able to change the post based on their comments.

Sending a test post to yourself
Check how your post looks and Send a test email to yourself before sending it to your team. Click the Send a test email button and confirm your request to receive the test post.
That's it! You're now ready to start scheduling your posts.